Bootstrapping New Project
Assuming you already have node and npm installed (if not: we recommend using nvm), you can install nodebootstrap via NPM and use the nodebootstrap CLI tool to create a brand-new skeleton project.
You can replace hello in the installation command, with a sensible name for
your project. Once the new project is built (typically takes less than a
minute), you need to start it via a bash script. When the application finishes
start you should see a simple “home document” response at:
http://localhost:3000/ (for microservice mode, follow instructions given
by npm start since the port is not going to be 3000.)
Installing nodebootstrap and building a new project:
$ npm install nodebootstrap -g
$ # if  you want a blueprint for a Node microservice with Docker:
$ nodebootstrap ms-first-microservice
$ # of if you are building a simple web application:
$ nodebootstrap hello -m webapp
$ # If you're building just an API
$ # if you want to customize destination location:
$ nodebootstrap best-api -p ~/projects/bestapi -m api
Once the project is built, you will get instructions on how to start it.
Webapp and API modes can run using a node environment on your computer or in a Docker container. Microservice mode only works in a container (intentionally).
IF you do not have Docker and Docker Composer properly set up, on your machine, for Mac and Windows the easiest way is to use Docker tooling: https://www.docker.com/community-edition and you can instal Docker on Linux natively via public repositories, even more easily.
Project Structure
One of the benefits of using Node Bootstrap is the well-structured project skeleton it creates.
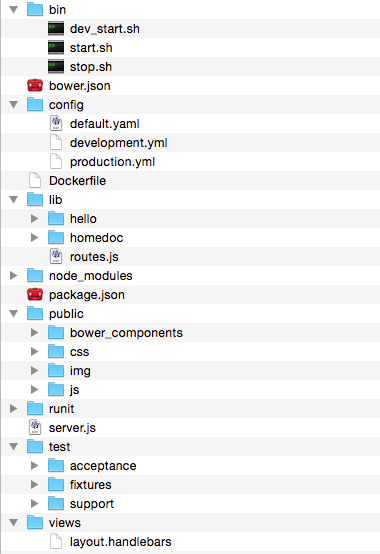
Various parts of the project structure:
- bin
- Startup scripts for dev and production environments. Feel free to create more.
- config
- configuration files for various environments, set by $NODE_ENV environmental variable. default is the baseline that is inherited by all others. Don’t create an explicit environment called default.
- lib
- this is where various modules your application logic consists of go under. Ideally, you should design all your modules as self-contained code that could be cleanly installed and uninstalled to add/remove distinct functionality, without touching other parts of the code. Node Bootstrap goes extra mile to promote self-contained modules. Self contained modules allow higher degree of reuse.
- node_modules
- this is where third-party modules installed via npm go under. Typically you install these using
npm install modulename --savecommand. - public
- dedicates space for static assets (images, js, css). The benefit of this folder is that you can point a web-server (e.g. Nginx or Apache) directly to this folder and not “bother” node on serving these files.
- runit
- Startup scripts for Docker-mode.
- test
- This is where you put your various types of automated tests. Node Bootstrap comes fully configured for Mocha unit and integration tests and even: Casper/Phantom drivers for Mocha to write powerful acceptance tests targeted at web applications. Istanbul coverage reports and batteries included.
- views
- Place to put your shared template files under. Node Bootstrap is, by default, pre-configured for Handlebars templates, but you can use any other Express4-friendly templating engine, even: alongside Handlebars, if you want. Typically templates should be encapsulated in their respective modules (which also have views folders, see the sample modules under “lib”), but in case you need to share some templates across various modules: this is where you’d do it.
Encapsulated Modules
In addition to solving common boilerplate, central design principle of NodeBootstrap is to compose applications with re-usable, fully encapsulated, targeted set of modules.
TJ Holowaychuk explains this approach in a video screencast: http://vimeo.com/56166857
In a more “spaghetti” Node project you may see HTTP route handlers in the main script or application area, tangled together. What TJ argues for and NodeBootstrap implements is: letting each module declare their own handlers, so if you are installing a “user management” or “blog” module, all you need to do is NPM install that module and indicate from the main app where in the URL path the routes get attached.
Feel free to check-out more details about module design per NodeBootstrap in the source code of the sample module.
For a more advanced example, see: https://github.com/inadarei/nodebootstrap/tree/master/lib/hello
Compare this, in your main server.js file:
app.use('/users', require('./lib/user')); // attach to sub-route
to this:
app.get('/user', user.get);
app.post('/user', user.new);
app.delete('/user', user.remove);
...
app.get('/users/locations', user.getLocations);
app.post('/users/photos', user.getAvatars);
First is how NodeBootstrap handles things, the latter: what you may, alas, see in many projects that don’t use elegant componentization similar to NodeBootstrap style.
Contextualizing Runtime Environment
A number of environmental variables can affect the runtime behavior and startup mode of a Node Bootstrap project. A lot of those variables get their default values via bin/dev_start.sh and bin/start.sh shell scripts, but they won’t override the values if a value already exists, so you are in full control.
List of environmental variables:
- NODE_LAUNCH_SCRIPT
- defaults to “server.js”
- NODE_ENV
- defaults to “production”
- NODE_CLUSTERED
- defaults to 1 (on)
- NODE_HOT_RELOAD
- defaults to 0 (off)
- NODE_SERVE_STATIC
- defaults to 0 (off) - in production you should serve static content with NginX, not: Node.
- NODE_CONFIG_DIR
- defaults to “config” folder in the current folder
- NODE_LOG_DIR
- defaults to “logs” folder in the current folder
Startup Scripts
NodeBootstrap comes with three shell scripts (located in the bin folder):
- dev_start.sh
- will start your server.js node app in single-CPU mode with hot-realoading of code enabled. Convenient for active development.
- start.sh
- will start your server.js without hot-reloading, but with as many child processes as you have CPU cores. Recommended for production.
- stop.sh
- is a counterpart of start.sh to easily stop running background processes.
By default, dev_start.sh also lets Express.js handle static files so you don’t have to have a web server. The production version: start.sh assumes that you want your web-server (Nginx?) to take on this job.
Put something like this (as root) in your /etc/limits.conf or /etc/security/limits.conf:
* hard nofile 10000
Then log out, log back in and run:
> ulimit -n 10000
Hot Reloading vs. Daemon-izing Script.
In production environments it is a good idea to daemon-ize your Node process using so that it restarts if the process gets killed or crashes for some reason Nodemon. In non-Docker version Nodemon package is used for this purpose. In Docker version of NodeBootstrap installation runit manages the same.
While actively developing a project, it is very convenient to have “hot-reloading” of code available i.e. to have Node processes automatically restart themselves when you save a source file. If you set NODE_HOT_RELOAD to 1, start.sh will run in hot-reloading mode watching your: main script, as well as libs and config folders.
File Limits
Hot reloading uses native file watching features of unix-compatible systems. This is extremely handy and efficient, but unfortunately most systems have very low limits on watched and open files. If you use hot reloading a lot, you should expect to see: “Error: watch EMFILE” or similar.
To solve the problem you need to raise your filesystem limits. This may be a two-step process. On Linux, there’re hard limits (something root user can change in /etc/limits.conf or /ets/security/limits.conf) that govern the limits individual users can alter from command-line.
You should probably put ulimit -n 10000 in your .profile file, because it does not persist between restarts.
For OS-X and Solaris-specific instructions see a Stackoverflow Answer
Put something like this (as root) in your /etc/limits.conf or /etc/security/limits.conf:
* hard nofile 10000
Then log out, log back in and run:
> ulimit -n 10000
On certain Linux distributions you may also need to raise iNotify limit:
> sysctl fs.inotify.max_user_instances=16384 \
> && echo sysctl fs.inotify.max_user_instances=16384 \
> | sudo tee /etc/rc.local
And last, but not least, it’s a good idea to also run:
> sudo sysctl -w kern.maxfiles=40960 kern.maxfilesperproc=20480